shiro的基本概念

权限管理包括 ==身份认证== 和 ==授权== 两部分。

首先经过身份认证,认证通过后该用户具有权限再访问受访问控制的资源。

shiro中的认证

最常见思路:核对用户名和口令。

认证的关键对象:subject,访问系统的主体。

Principal:身份信息,身份认证的标识。标识必须具有唯一性。一个主体可以有多个身份信息,但是必须有一个主身份。

credential:凭证信息,只有主体自己知道的安全信息,如密码,证书等。

认证的源码流程

(想要深入了解,就从quickStart开始,一点点看源码学习,使用调试工具来看)

subject.login一定是关键的步骤:

对于下面的函数:
currentUser.login(token);
点击进去看看发生了什么:
我们会看到底层是securityManager在做这个认证的核心流程:

1
2
3
4
public void login(AuthenticationToken token) throws AuthenticationException {  
this.clearRunAsIdentitiesInternal();
Subject subject = this.securityManager.login(this, token);
String host = null;

因此我们继续点击去看securityManager的login是如何实现的:

1
2
3
4
5
public Subject login(Subject subject, AuthenticationToken token) throws AuthenticationException {  
AuthenticationInfo info;
try {
info = this.authenticate(token);

经过上面这样的寻踪觅迹,就可以定位到下面的代码:

1
2
3
4
5
	protected AuthenticationInfo doAuthenticate(AuthenticationToken authenticationToken) throws AuthenticationException {  
this.assertRealmsConfigured();
Collection<Realm> realms = this.getRealms();
return realms.size() == 1 ? this.doSingleRealmAuthentication((Realm)realms.iterator().next(), authenticationToken) : this.doMultiRealmAuthentication(realms, authenticationToken);
}

根据函数的名字,可以看到,首先验证一下是否配置了realm,然后根据realm的数量调用不同的用realm处理的函数。

我们查看这里的doSingleRealmAuthentication代码:

1
2
3
4
5
6
7
8
9
10
11
12
13
14
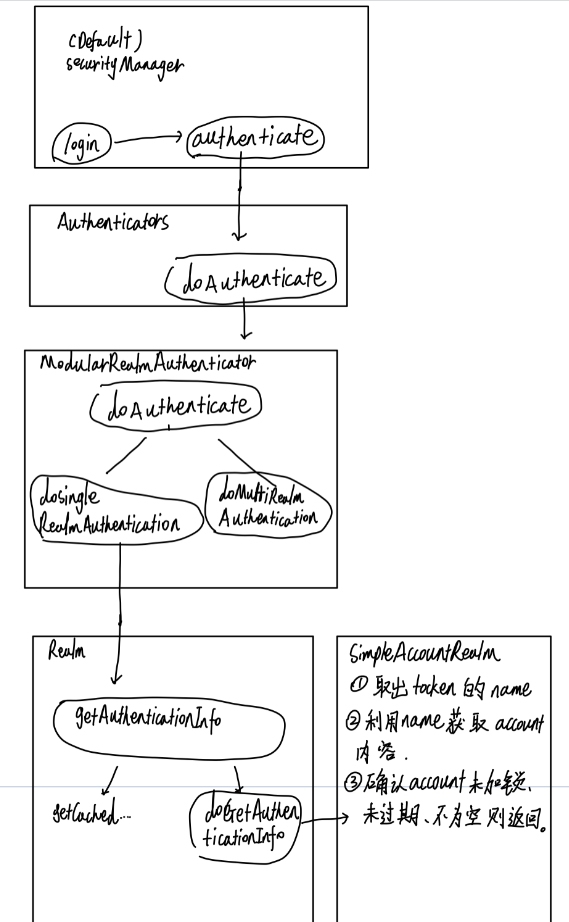
protected AuthenticationInfo doSingleRealmAuthentication(Realm realm, AuthenticationToken token) {  
if (!realm.supports(token)) {
String msg = "Realm [" + realm + "] does not support authentication token [" + token + "]. Please ensure that the appropriate Realm implementation is configured correctly or that the realm accepts AuthenticationTokens of this type.";
throw new UnsupportedTokenException(msg);
} else {
AuthenticationInfo info = realm.getAuthenticationInfo(token);
if (info == null) {
String msg = "Realm [" + realm + "] was unable to find account data for the submitted AuthenticationToken [" + token + "].";
throw new UnknownAccountException(msg);
} else {
return info;
}
}
}

这里的核心方法是利用realm来获取认证信息getAuthenticationInfo,我们点进去看看:

1
2
3
4
5
6
7
8
9
10
11
12
13
14
15
16
17
18
19
20
public final AuthenticationInfo getAuthenticationInfo(AuthenticationToken token) throws AuthenticationException {  
AuthenticationInfo info = this.getCachedAuthenticationInfo(token);
if (info == null) {
info = this.doGetAuthenticationInfo(token);
log.debug("Looked up AuthenticationInfo [{}] from doGetAuthenticationInfo", info);
if (token != null && info != null) {
this.cacheAuthenticationInfoIfPossible(token, info);
}
} else {
log.debug("Using cached authentication info [{}] to perform credentials matching.", info);
}

if (info != null) {
this.assertCredentialsMatch(token, info);
} else {
log.debug("No AuthenticationInfo found for submitted AuthenticationToken [{}]. Returning null.", token);
}

return info;
}

这里就又调用doGetAuthenticationInfo方法来获取验证信息。同时注意一个点,这里我们从缓存里面获取了认证信息,后续也可以对缓存进行配置。
继续点进去,我们发现该方法是抽象方法,有多个实现类都有实现,我们quick start的实现类是SimpleAccountRealm,我们点进去看看程序是如何实现的。

1
2
3
4
5
6
7
8
9
10
11
12
13
14
15
16
protected AuthenticationInfo doGetAuthenticationInfo(AuthenticationToken token) throws AuthenticationException {  
UsernamePasswordToken upToken = (UsernamePasswordToken)token;
SimpleAccount account = this.getUser(upToken.getUsername());
if (account != null) {
if (account.isLocked()) {
throw new LockedAccountException("Account [" + account + "] is locked.");
}

if (account.isCredentialsExpired()) {
String msg = "The credentials for account [" + account + "] are expired";
throw new ExpiredCredentialsException(msg);
}
}

return account;
}

最终执行用户名比较是在上面的代码中进行的。

上面的方法只是校验了用户名是否是在注册的用户名中,这里返回一个account,返回account后再在上层的方法中检验密码,这里是在下面的代码中做下面的事情的:

1
2
3
4
5
6
7
8
9
10
11
12
13
14
15
16
17
18
19
public final AuthenticationInfo getAuthenticationInfo(AuthenticationToken token) throws AuthenticationException {  
AuthenticationInfo info = this.getCachedAuthenticationInfo(token);
if (info == null) {
info = this.doGetAuthenticationInfo(token);
log.debug("Looked up AuthenticationInfo [{}] from doGetAuthenticationInfo", info);
if (token != null && info != null) {
this.cacheAuthenticationInfoIfPossible(token, info);
}
} else {
log.debug("Using cached authentication info [{}] to perform credentials matching.", info);
}
if (info != null) {
this.assertCredentialsMatch(token, info);
} else {
log.debug("No AuthenticationInfo found for submitted AuthenticationToken [{}]. Returning null.", token);
}

return info;
}

这里用一个断言来判断tocken和info是否匹配。
下面是具体的方法实现:

1
2
3
4
5
6
7
8
9
10
11
protected void assertCredentialsMatch(AuthenticationToken token, AuthenticationInfo info) throws AuthenticationException {  
CredentialsMatcher cm = this.getCredentialsMatcher();
if (cm != null) {
if (!cm.doCredentialsMatch(token, info)) {
String msg = "Submitted credentials for token [" + token + "] did not match the expected credentials.";
throw new IncorrectCredentialsException(msg);
}
} else {
throw new AuthenticationException("A CredentialsMatcher must be configured in order to verify credentials during authentication. If you do not wish for credentials to be examined, you can configure an " + AllowAllCredentialsMatcher.class.getName() + " instance.");
}
}

最终密码的校验是在AuthenticationRealm中的assertCredentialsMatch方法进行校验的。

因此,如果我们需要将密码信息存放在数据库中,我们应该将SimpleAccountRealm中的doGetAuthenticationInfo重写,对于我们来说,就应该是自己写一个Realm来继承AuthorizingRealm。

注意,密码的校验在AuthenticationRealm中自动进行校验,不用我们操心。shiro可能会有一些密码加密的操作,所以密码的验证由shiro封装。

image-20220907210010641

其实密码校验的实现是很简单的。之前的授权用户验证操作不是取出了用户,并将用户的信息返回了吗,然后密码的校验就是将当前访问对象的信息和用户信息做了对比。

最终可以总结如下的一个流程:

1.login
2.确定Realm的数量,对于不同的Realm数量会有不同的处理方式。
3.利用Realm获取验证tocken,输出info信息。
4.Realm验证tocken,用的是getAuthenticationInfo
5.getAuthenticationInfo中,首先从缓存中看是否有info,如果缓存没有,那么就调用Realm的doGetAuthenticationInfo。
6.doGetAuthenticationInfo是一个抽象方法,可以由用户实现。其中quick Start的入门实现类是SimpleAccountRealm。
7.SimpleAccountRealm主要通过tocken获取用户账号,然后判断用户账号的状态。
8.如果账号状态有效,那么就进一步实现对密码的校验;这个校验的函数是由shiro写的。

下面是一个流程图:

image-20220907210028787

shiro 整合 SpringBoot

整合思路:

原来的思路:用户登录。

系统资源可以分为:公共资源,受限资源。

1.将所有的请求交给shiro处理。
2.通过filter拦截所有的请求。(ShiroFilter,将请求拦截然后处理请求,认证操作和授权操作)
3.当请求的资源有对应的权限的时候,继续拦截判断。
4.shiroFilter还是要去找SecurityManager进行认证授权。
image-20220907210046259

1.引入依赖。
2.进行shiroConfig。
创建shiroFilter,直接利用FactoryBean产生。
创建安全管理器。
创建自定义realm。

注意上述都是bean对象。
shiroFilter利用set方法将安全管理器传入。
安全管理器利用set方法将realm传入。

其中realm自定义实现,即返回一个customRealm即可。

在shiroFilter中设置受限资源和公共资源。
map中可以表示资源路径,val表示不同的权限。

在shiroconfig中进行配置。下面是一个filter的配置代码:

1
2
3
4
5
6
7
8
9
10
11
12
13
14
15
16
17
18
19
20
21
22
23
24
25
26
27
28
29
30
31
32
33
34
35
36
37
38
39
40
41
42
43
44
45
46
47
48
49
50
51
52
53
54
55
56
57
58
59
60
61
62
63
64
65
66
67
68
69
70
71
72
73
74
75
 public ShiroFilterFactoryBean shiroFilter(SecurityManager securityManager) {  
ShiroFilterFactoryBean shiroFilterFactoryBean = new ShiroFilterFactoryBean();

//下面设置SecurityManager,这个都是固定的
shiroFilterFactoryBean.setSecurityManager(securityManager);

//访问需要登录的接口,却没有登陆,调用此接口
shiroFilterFactoryBean.setLoginUrl("/test/pub/needLogin"); //这里会设置一个默认的认证界面路径

//没有权限,未授权会调用此方法,先验证登陆再验证权限
shiroFilterFactoryBean.setUnauthorizedUrl("/test/pub/notPermit");

//设置自定义filter
Map<String, Filter> filterMap = new LinkedHashMap<>();
// filterMap.put("authcBasic", new WhitelistedBasicHttpAuthenticationFilter());
filterMap.put("roleOrFilter", new CustomRolesAuthorizationFilter());

// filterMap.put("authc", new ShiroFormAuthenticationFilter());
shiroFilterFactoryBean.setFilters(filterMap);


//拦截器路径。【坑】部分路径无法拦截,时有时无:因为使用了HashMap,要改成linkedHashMap
Map<String, String> filterChainDefinitionMap = new LinkedHashMap<>();


//swagger2测试时需要开放
// filterChainDefinitionMap.put("/swagger-ui.html", "anon");
// filterChainDefinitionMap.put("/webjars/**", "anon");
// filterChainDefinitionMap.put("/v2/**", "anon");
// filterChainDefinitionMap.put("/swagger-resources/**", "anon");
// filterChainDefinitionMap.put("/configuration/security", "anon");
// filterChainDefinitionMap.put("/configuration/ui", "anon");


//退出过滤器
// filterChainDefinitionMap.put("/hlsii/pub/logout", "logout");

//游客模式
filterChainDefinitionMap.put("/test/pub/**", "anon");
filterChainDefinitionMap.put("/test2/status", "anon");
filterChainDefinitionMap.put("/status", "anon");

// filterChainDefinitionMap.put("/radiation", "anon");
// filterChainDefinitionMap.put("/highfrequency", "anon");
// filterChainDefinitionMap.put("/test", "anon");


//登陆用户才可以访问
// filterChainDefinitionMap.put("/authc/**", "authc");

//管理员角色才可以访问
filterChainDefinitionMap.put("/test/admin/**", "roleOrFilter[admin]");
filterChainDefinitionMap.put("/test/userLog/**", "roleOrFilter[admin]");
// filterChainDefinitionMap.put("/hlsii/user/**", "roleOrFilter[user],roleOrFilter[admin]");
filterChainDefinitionMap.put("/test/user/**", "roleOrFilter[user,admin]");


//有编辑权限才可以访问
// filterChainDefinitionMap.put("/video/update", "perms[video_update]");


//【坑2】:过滤链是顺序执行的,从上而下,所以/**要放到最后
//authc : url定义必须通过认证才可以访问
//anon : url可以匿名访问

//其余所有接口都需要登录
filterChainDefinitionMap.put("/**", "authc");

//其余所有接口都不需要登录(测试时使用)
// filterChainDefinitionMap.put("/**", "anon");

shiroFilterFactoryBean.setFilterChainDefinitionMap(filterChainDefinitionMap);

return shiroFilterFactoryBean;
}

shiro有一些常用的过滤器,可以用配置缩写来指定:
image-20220907210108238

在web环境中,只要使用到安全管理器,那么shiro就会自动注入安全管理器。

关于session的说明

session是用来进行会话控制的。
如果第一次请求,那么会话没有建立,这时web服务器将新建一个session对象。会话过期,则session丢弃。
HttpSession是java对session实现的一个规范。

当浏览器向服务器请求的时候,服务器会新建立session,并将session标识放到响应头的Set-cookie中,以key-value的形式返回给客户端;客户端下次请求服务器的时候,服务器根据此ID寻找对应的session对象。

session和cookie主要有如下的区别:

  • cookie保存在客户端,Session保存在服务器端

  • cookie只能保存ASCII,Session可以存任意数据类型;且session可存储的数据大小远大于ASCII

  • Cookie可以设置为长时间保持,Session超时或者客户端关闭Session就会失效

但是由于Session保存在服务器端,所以也存在一些问题。。如果在某一时间段内访问站点的用户很多,web服务器内存中就会积累大量的HttpSession对象,消耗大量的服务器内存,即使用户已经离开或者关闭了浏览器,web服务器仍要保留与之对应的HttpSession对象,在他们超时之前,一直占用web服务器内存资源。因此可以采用将session持久化的策略,比如shiro常常和redis进行配合管理session。